Need to learn to switch a WordPress web site to a different area simply? If that’s the case, you’ve come to the suitable place. This easy-to-follow step-by-step tutorial will present you precisely methods to do it efficiently with out shedding on website positioning or content material.
I’ve transferred web sites to new domains many occasions in my profession, and I perceive it may be a troublesome job when you’re doing it for the primary time.
The primary day’s expertise remains to be recent in my thoughts.
I keep in mind scouring the web for a complete step-by-step information. Sure, there have been tutorials out there. Nonetheless, they weren’t what I had anticipated.
Briefly, it appeared sophisticated.
Finish outcome?
I needed to delay the considered transferring my web site to a different area a number of occasions as a result of I used to be afraid of shedding content material or website positioning ranking.
However maintain on…
In the event you’re in the identical boat, there’s no must be anxious.
Since I’m going to point out you methods to switch a WordPress web site to a brand new area on this tutorial. And, one of the best half is that it’s utterly free.
Isn’t it unimaginable?
To be sincere, there are numerous methods to do it. However, I’ll present you the only technique that I’ve discovered to be helpful for each newcomers and specialists.
Let’s get began.
On this tutorial…
- The previous web site is the one that you’re transferring.
- The brand new web site is the one the place you wish to transfer your information and databases.

Regardless that you could be fairly positive that the switch shall be straightforward and the whole lot will go clean, it’s a sensible option to backup your web site.
It doesn’t matter how cautious you might be, you’ll be able to at all times make a mistake.
Backing up the web site offers me peace of thoughts in case I make a mistake or one thing goes unsuitable. Actually, we are able to by no means make certain when disasters strike.
And, I like to recommend it to everybody earlier than taking any motion in your website.
The excellent news?
Backing up your WordPress web site is extremely straightforward.
As a result of there are many free WordPress backup plugins out there. On this publish, I’ve additionally talked about a few of the best backup plugins.
Simply set up any one among these backup plugins.
Activate it and save a replica of your website to a distant storage location earlier than transferring to step one of transferring your web site to a brand new area.

Though there are a number of backup plugins on the market, I’ve discovered that WPvivid is among the greatest and best options on the market.
The plugin is totally free to obtain and use in your website.
One of the best factor?
It makes the method of transferring your web site to a brand new area an entire lot simpler than ever earlier than. Clearly, step one is to put in the plugin.
You may obtain the plugin from the official website or from WordPress repository.
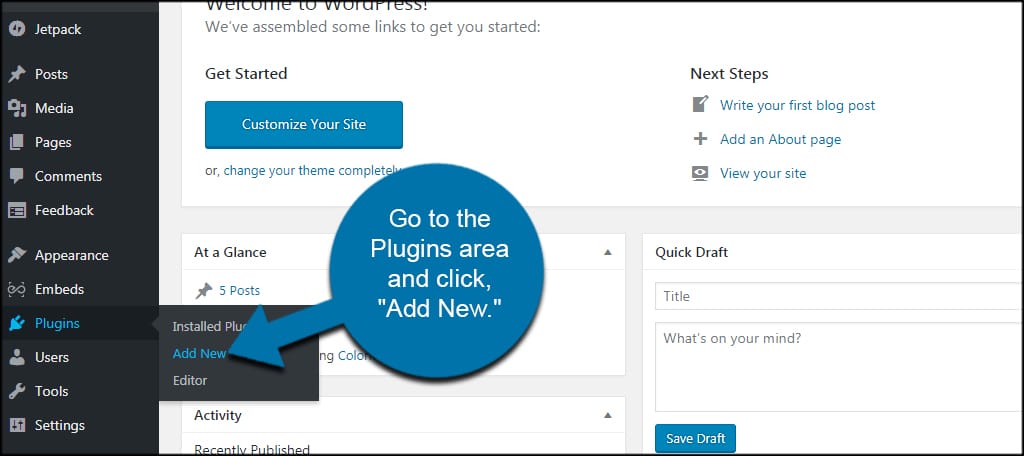
The set up course of is straightforward. Click on Plugins > Add New.
On the following web page, search with the key phrase WPvivid.
Then, set up the primary plugin that comes within the search outcome.

Hit Set up now button and activate it.
Now, from the left sidebar, click on WPvivid backup > Backup & Restore.
Now you might be on the dashboard of WPvivid backup.

Click on on the distant storage tab.
There are a number of distant backup areas you’ll be able to select when utilizing WPvivid plugin. Under are a number of the distant storage choices you’ll discover.
- Google drive
- Dropbox
- Microsoft OneDrive
- Amazon S3
Some of the frequent storage choices is Google drive.
When you’ve got a google account, you’ve a Google drive account too. So simply choose the storage and authenticate it with Google drive.
As soon as achieved, get again to WPvivid plugin dashboard.
Select Ship Backup to Take away Storage.

And, hit the Backup now button.
When you hit the backup now button a backup progress bar will seem, displaying you the progress of your web site backup.

Relying on how giant your web site is, backup can take wherever from a couple of minutes to some hours. So, please be affected person till it’s accomplished.
Step four: Generate a Switch Key
Please word that the switch key ought to be generated from the brand new web site or your vacation spot web site or the brand new URL to which you need the web site to be transferred. Don’t neglect it or issues can get actually tousled.
So, you’ll have to put in WordPress in your new area identify.
I consider you already know methods to set up WordPress in your area identify. As a result of you have already got a website that you simply wish to switch to a brand new area.
In the event you nonetheless need assistance, you’ll be able to check out this article the place I’ve described how to install WordPress on your HostGator hosting account. Completely different internet hosting suppliers might have other ways to do it. However the fundamentals are at all times the identical.
In its place, you too can use FTP to manually set up WordPress.
After profitable WordPress set up in your new area, log into your WordPress dashboard. And, set up and activate WPvivid backup plugin.
Go to WPvivid Backup dashboard and click on on the Key tab.

Right here, click on on the Generate button.
Virtually instantly, you’ll have your switch key generated within the decrease field.

Now, copy the important thing that’s generated and get again to your previous website.
Within the subsequent step, you’ll clone and switch your backup to your new area or website.
Step 5: Clone The Switch
On this step, all of the duties have to accomplished in your previous web site or previous area.
Log in to the WordPress dashboard of your previous website and transfer to the WPvivid dashboard. From right here, you’ll have to click on on the Auto-migration tab.

Now, copy the important thing generated from the previous area or website and paste it right here.

Then, click on the button that claims Clone then Switch.
Relying on how giant your web site is, it may possibly take wherever from a couple of minutes to some hours to switch your complete website to the brand new area.
Apparently, there’s a progress bar that can present you the switch progress.

As soon as the method is accomplished, you’ll get successful message.

Please word that your new web site on the brand new area is not going to replicate the modifications till you restore the backup out of your new website.
And, that’s what we’re going to do within the subsequent step.
Step 6: Restore Your Web site
Now, log into your the WordPress dashboard of your vacation spot area.
Go to WPvivid dashboard.
Scroll down to seek out the backup acquired out of your previous area’s web site. The backup shall be tagged as Obtained backup and the sort shall be Migration.

All you should do now could be to click on Restore.
You’ll be requested to substantiate once more. Hit restore once more to begin restoring your website from the backup. As soon as the restoration is accomplished, you’ll see that your previous website has been transferred out of your previous area to your new area.
You need to now be logged out because the WordPress password will now change. Clearly, it is going to be the identical password that you simply used in your previous area’s website.
Congratulations!
You might have transferred your WordPress web site to a brand new area identify.
Step 7: Test All the things
That is the ultimate step.
As chances are you’ll already guess, your job is to examine if the whole lot has been transferred correctly. Test your inside hyperlinks, exterior hyperlinks, redirections and so forth.
Hopefully, nothing unsuitable would occur when you adopted my directions correctly.
Remaining Ideas
And, that’s the way you switch a WordPress web site to a brand new area.
I hope I used to be in a position to make this tutorial so simple as potential. And my goal that will help you learn to switch your web site to new area was profitable.
Now, you understand how to do it efficiently. 🙂
It actually makes me blissful.
Lastly, when you discovered this tutorial helpful and really feel that others could also be benefited from this text, please share it. It actually motivates me to create extra content material like this.


